Classic Deviled Eggs
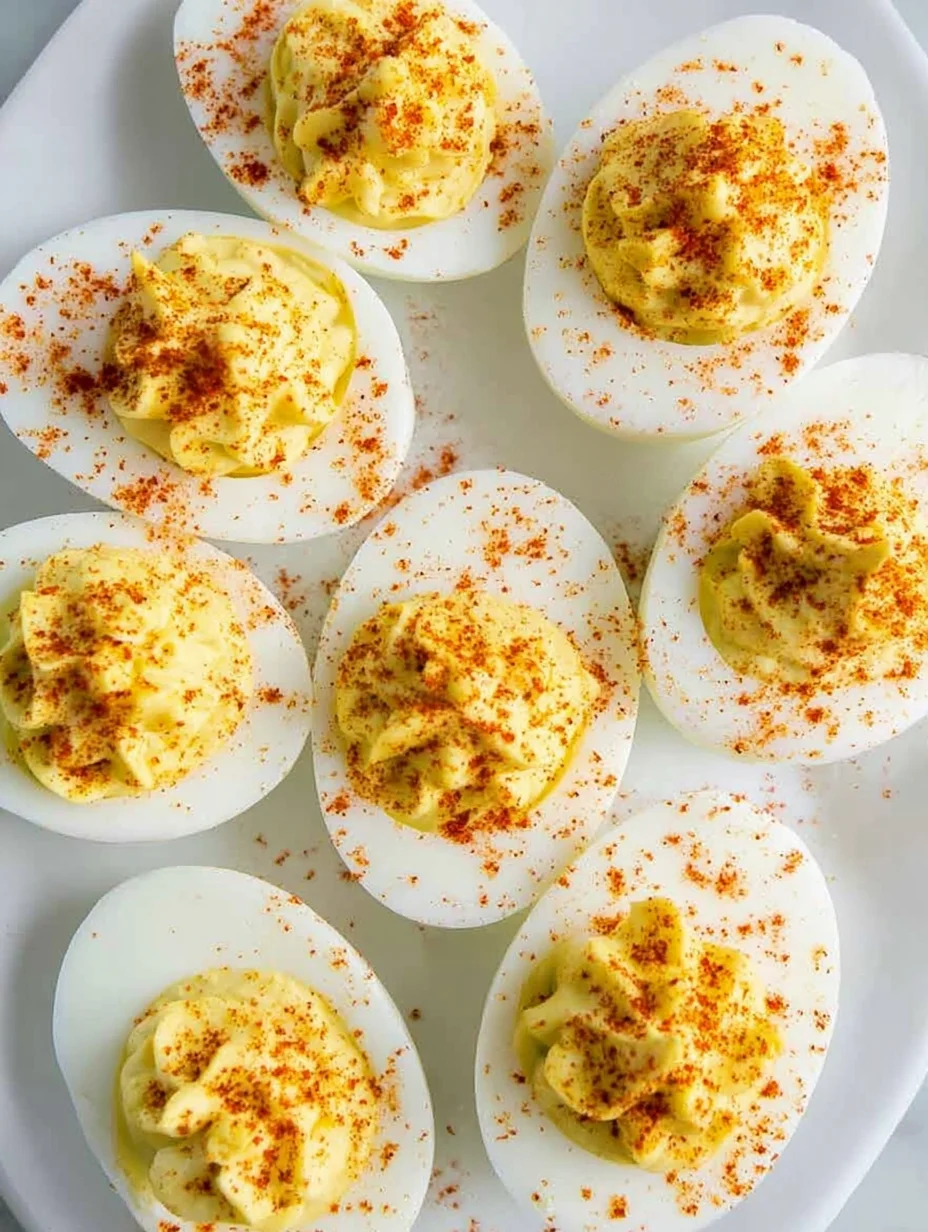
Who doesn’t love a tray of Classic Deviled Eggs at a family gathering or potluck? I’ve been making these delightful bites since I was a kid, helping my mom in the kitchen, and they never fail to bring smiles all around. There’s something so satisfying about that creamy filling nestled in the tender egg white—it’s the ultimate comfort food appetizer that screams homemade goodness. If you’re looking for an easy way to impress your guests, this Classic Deviled Eggs recipe is your go-to, blending simple ingredients into something truly special.
In my experience, Classic Deviled Eggs are incredibly versatile; you can whip them up for holidays, game days, or just a casual snack. What I love most is how they take me back to simpler times, yet they’re always a hit with modern twists if you want to experiment. Let’s be honest, once you try this foolproof method, you’ll wonder why you ever bought them store-bought. I’m excited to share my tried-and-true recipe so you can create your own batch of these crowd-pleasing treats.
Pair them with favorites like our egg roll in a bowl for an Asian-inspired twist or alongside a hearty burger bowl for a full meal spread. Get ready to master Classic Deviled Eggs and become the star of your next event!
Grab This Chef Knife Now - Almost Gone!

- Stays Razor-Sharp: Ice-hardened blade keeps its edge longer than ordinary knives
- Superior Grip Control: Unique finger hole design gives you perfect balance and safety
- Built to Last a Lifetime: Premium stainless steel blade with elegant beech wood handle
- ✓ Finally, a knife that stays sharp and feels comfortable in my hand
- ✓ Professional quality without the premium price tag
- ✓ Makes meal prep faster and more enjoyable
⏰ Only a few items left in stock - order soon
Key Takeaways:
- Classic Deviled Eggs are a timeless appetizer that’s quick to prepare and always a crowd favorite at parties.
- This recipe takes just 30 minutes total, making it perfect for busy cooks who want effortless entertaining.
- The creamy, tangy filling delivers bold flavors that balance perfectly with the mild egg base.
- For the best results, use fresh eggs and chill the filling before piping to achieve that smooth texture.
- Store leftovers in an airtight container for up to 3 days, and they reheat beautifully for impromptu snacks.
Why You’ll Adore This Classic Deviled Eggs
Timeless Appeal: Classic Deviled Eggs have been a staple at gatherings for generations, and for good reason—they’re nostalgic yet endlessly adaptable. I remember my first potluck where these stole the show; everyone kept coming back for more. You’ll love how they evoke those warm, feel-good memories while fitting seamlessly into any menu.
Effortless Preparation: What could be easier than boiling a few eggs and mixing up a creamy filling? This recipe is beginner-friendly, requiring no fancy equipment, just basic kitchen tools you already have. In my experience, it’s the kind of dish that lets you focus on enjoying the party instead of stressing in the kitchen.
Irresistible Flavor: The combination of tangy mustard, smooth mayonnaise, and a hint of paprika in these Classic Deviled Eggs creates a flavor explosion that’s both comforting and sophisticated. Here’s the thing: that first bite always surprises with its creaminess. You won’t be able to eat just one!
Versatile Serving Options: Whether as a starter for brunch or a side for barbecues, Classic Deviled Eggs pair with almost everything. They’re low-carb and protein-packed, making them a smart choice for health-conscious eaters too. Let’s be honest, once your friends taste these, they’ll be requesting the recipe every time.
Grab This Kitchen Scale Now — Best Precision Pick!

- Razor-Accurate Every Time: Dual-increment precision down to 0.1g — perfect for baking, meal prep, and portion control with g, oz, ml, and fl'oz modes.
- Smart Removable Bowl Design: Detachable bowl doubles as a protective case for compact storage. Tare function lets you weigh ingredients in any container with zero fuss.
- Built for Everyday Convenience: Auto-zero, tare function, low battery alert, overload indicator, and 2-minute auto-off to extend battery life — all in a sleek stainless steel build.
- ✓ "Perfect for baking — precise, lightweight, and stores easily without wasting counter space"
- ✓ "A game changer! Weighing ingredients is now way more accurate than measuring cups"
- ✓ "Love the 0.1g precision and backlight — best food scale I've owned. Highly recommend!"
⏰ Only a few items left in stock - order soon
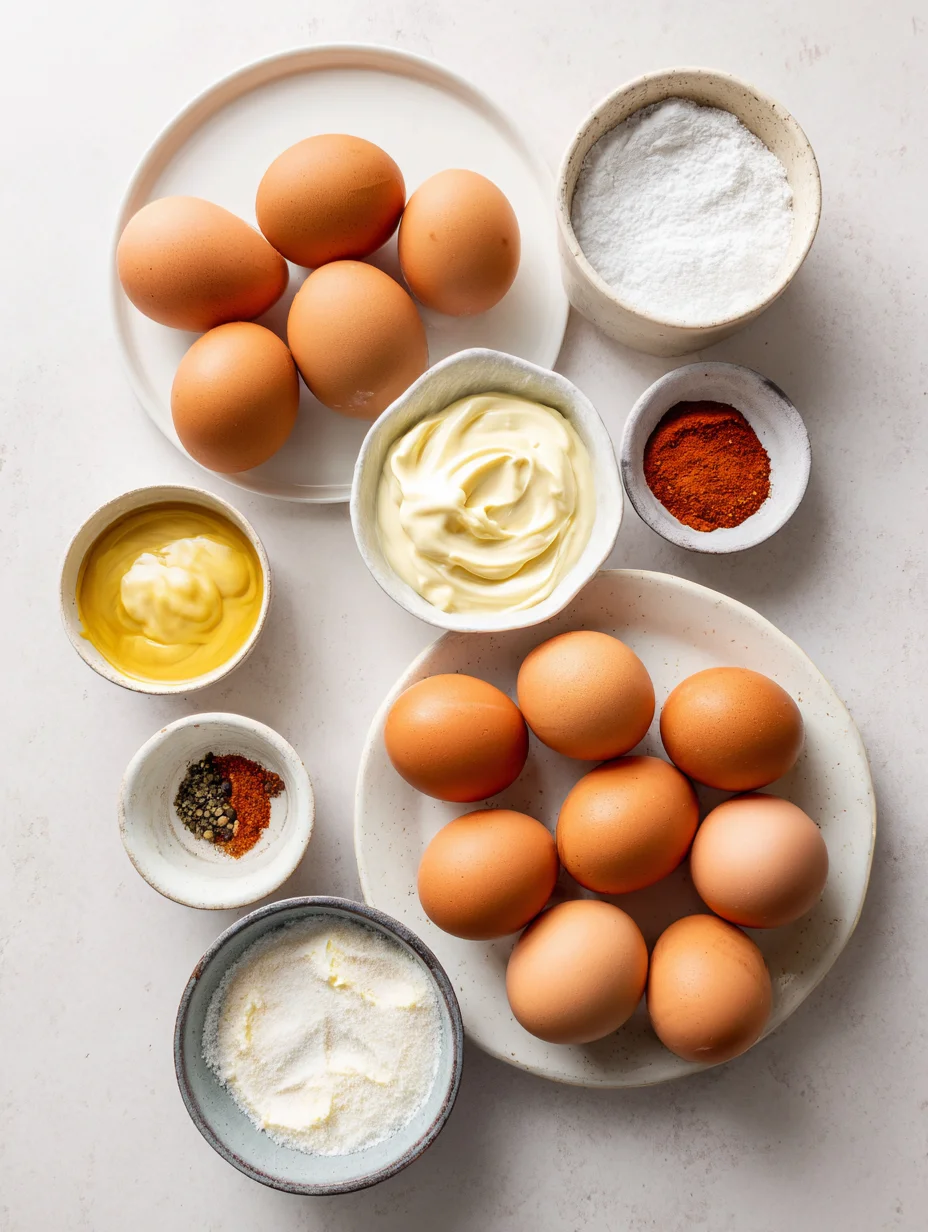
Essential Ingredients for Classic Deviled Eggs
Hard-Boiled Eggs: At the heart of any great Classic Deviled Eggs are perfectly cooked eggs—aim for 6 large ones to yield about 12 halves. They provide the sturdy vessel for the filling and a mild flavor that lets the seasonings shine. In my experience, using room-temperature eggs prevents cracking during boiling, ensuring smooth, intact whites every time. This base ingredient is non-negotiable for that authentic texture.
Mayonnaise: Creamy mayonnaise is the glue that binds the filling together, adding richness and smoothness to your Classic Deviled Eggs. Opt for full-fat for the best mouthfeel, about 1/4 cup for this recipe. I’ve tried lighter versions, but they often make the mixture too thin—stick with the classic for that indulgent quality. It balances the tanginess beautifully without overpowering the other flavors.
Dijon Mustard: A teaspoon or two of Dijon mustard brings a sharp, zesty kick that elevates the entire dish in Classic Deviled Eggs. It cuts through the richness of the mayo and adds depth you can’t get from yellow mustard alone. What I find interesting is how it subtly enhances the egg’s natural savoriness. Don’t skip it; it’s what makes homemade versions stand out from the rest.
How to Make Classic Deviled Eggs
Boil and Prepare the Eggs
Start by placing 6 large eggs in a saucepan and covering them with cold water by about an inch—this ensures even cooking for your Classic Deviled Eggs. Bring the water to a rolling boil over medium-high heat, then cover the pot, remove from the heat, and let them sit for 12 minutes. Once done, transfer the eggs to an ice bath to cool quickly, which makes peeling a breeze. In my experience, this method yields perfectly firm yolks without any green rings. Gently tap and peel under cool running water for the smoothest results, then slice each egg in half lengthwise to reveal those golden centers.
Mix the Creamy Filling
Now, scoop the cooked yolks into a medium bowl and mash them with a fork until crumbly— this is the foundation of your luscious Classic Deviled Eggs filling. Stir in 1/4 cup mayonnaise, 1 teaspoon Dijon mustard, 1 teaspoon white vinegar, a pinch of salt, and black pepper to taste; blend until smooth and creamy. Here’s the thing: taste and adjust seasonings as needed; sometimes I add a dash more vinegar for extra tang. The mixture should hold its shape but be pipeable, so if it’s too thick, a splash of pickle juice works wonders. Let it chill for 10 minutes to firm up, enhancing those flavors you’re about to enjoy.
Fill and Garnish
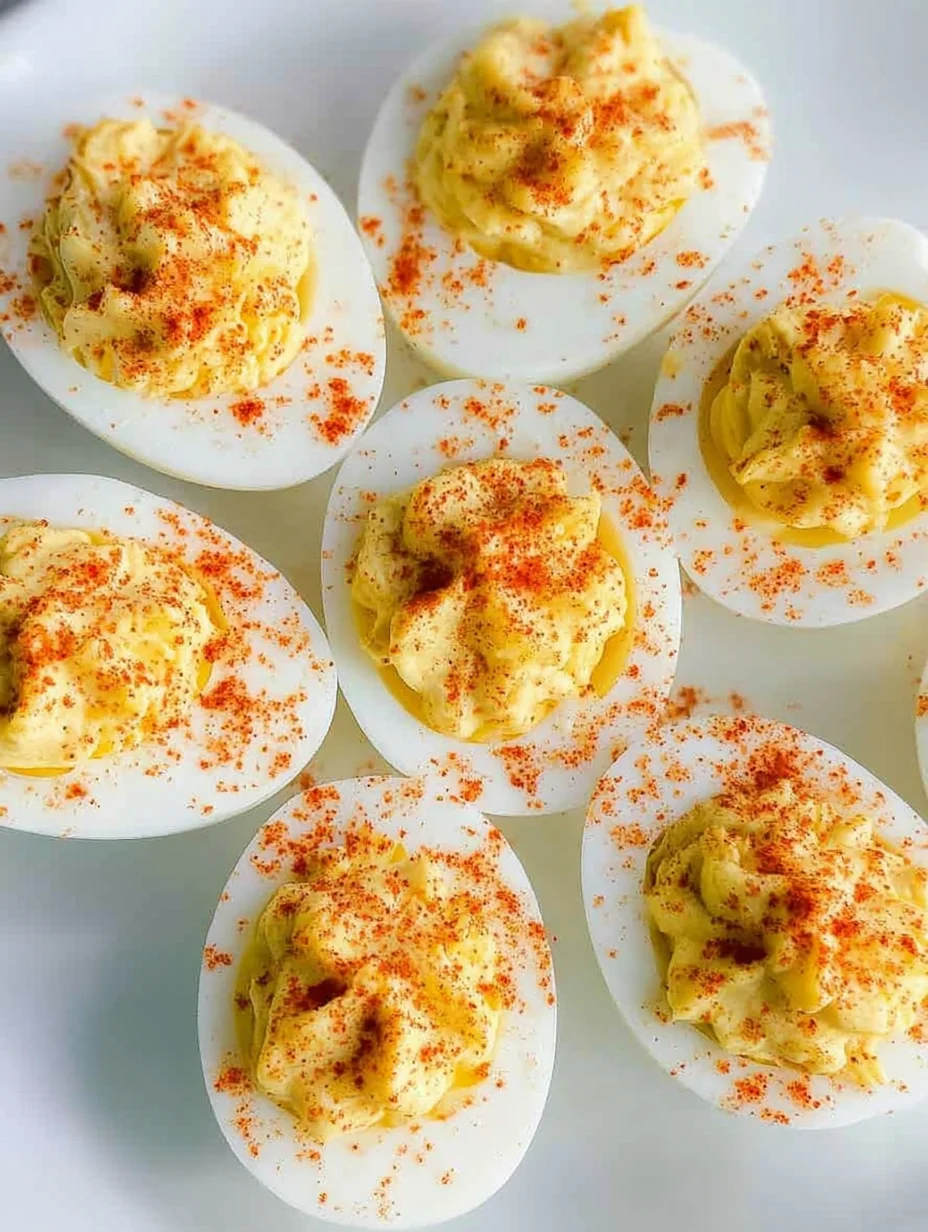
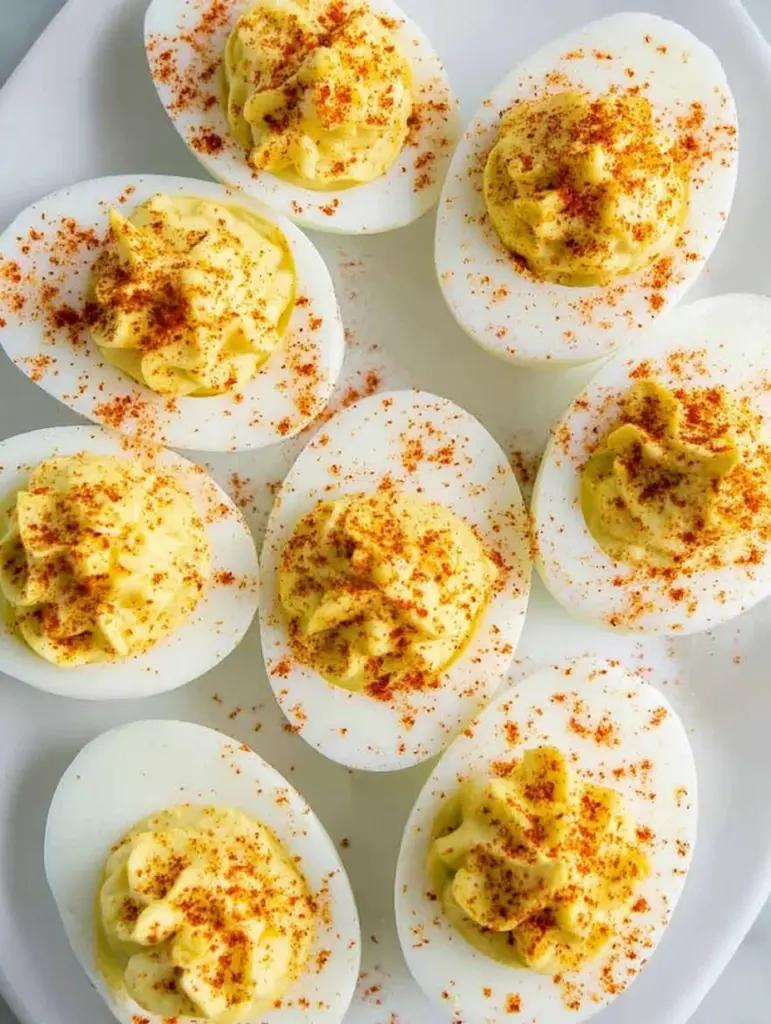
Spoon or pipe the chilled filling back into the egg white halves using a piping bag or zip-top bag with the corner snipped—this gives your Classic Deviled Eggs that professional polka dot look. For garnish, sprinkle paprika over the top for color and a subtle smokiness, and maybe some chopped chives if you’re feeling fancy. Arrange them on a platter and refrigerate until ready to serve; they’ll firm up nicely. What I love is how this final step transforms simple ingredients into elegant bites. If you’re prepping ahead, cover loosely to avoid that plastic-y smell.
Ingredients
- 6 large eggs
- ¼ cup mayonnaise
- 1 teaspoon Dijon mustard
- 1 teaspoon white vinegar
- Salt and black pepper, to taste
- Paprika, for garnish
- Optional: Chopped chives or relish for extra flavor
Classic Deviled Eggs Instructions
- Place eggs in a saucepan, cover with water, bring to a boil, then cover and let sit off heat for 12 minutes. Cool in ice bath and peel.
- Mash yolks with mayonnaise, mustard, vinegar, salt, and pepper until smooth. Chill for 10 minutes.
- Pipe or spoon filling into egg whites, garnish with paprika, and serve chilled.
Pro Tips for the Best Classic Deviled Eggs
Perfect Peeling Trick: Add a teaspoon of baking soda to the boiling water—it helps the shells slip right off without tearing the whites.
Flavor Boost: For a spicy kick, mix in a pinch of cayenne pepper to the filling; it adds warmth without overwhelming the Classic Deviled Eggs.
Piping Made Easy: If you don’t have a piping bag, use a sturdy zip-top bag—snip the corner and fill away for that neat presentation every time.
You Must Know
- Classic Deviled Eggs are best made with fresh eggs for easier peeling and brighter yolks.
- The vinegar in the filling adds acidity that balances the richness, preventing a heavy taste.
- Overcooking eggs can lead to rubbery whites—stick to the 12-minute rule for perfection.
- Paprika isn’t just for looks; it lends a mild smokiness that enhances the overall flavor profile.
How to Store Classic Deviled Eggs
To keep your Classic Deviled Eggs fresh, place them in a single layer on a covered plate or airtight container and refrigerate promptly—they’ll last up to 3 days. Avoid stacking to prevent the filling from smearing. If you need to reheat, they’re best served cold, but room temperature for 30 minutes brings out the flavors without risking spoilage. In my experience, they taste even better the next day as the ingredients meld.
Customizing Your Classic Deviled Eggs
Feeling adventurous with your Classic Deviled Eggs? Swap the Dijon for yellow mustard if you prefer a milder tang, or add bacon bits for a smoky twist that pairs well with our oyakodon chicken egg rice bowl. For a low-carb variation, incorporate avocado for creaminess instead of some mayo. These tweaks keep the dish versatile while staying true to its roots—experiment and make it your own.
What to Serve with Classic Deviled Eggs
Classic Deviled Eggs shine as an appetizer, but pair them with fresh veggie platters or a crisp green salad for balance. For heartier options, try them alongside grilled meats or our pumpkin coffee cake at brunch. Beverages like iced tea or sparkling wine cut through the richness perfectly. Don’t forget crusty bread for scooping up any extra filling—it’s a match made in heaven.
Classic Deviled Eggs
This easy and classic deviled eggs recipe is a timeless appetizer or side dish with the perfect blend of creamy mayonnaise, mustard and the yolks of hard-boiled eggs with a sprinkle of paprika for color.
Timing
Recipe Details
Ingredients
- 01 12 large eggs
- 02 1/4 cup mayonnaise
- 03 1 tablespoon mustard
- 04 1/2 teaspoon black pepper
- 05 salt (Pinch of)
- 06 Paprika (optional garnish)
Instructions
In a medium pot, place the eggs with just enough water to cover them.
Bring to a boil over medium-high heat and boil for 3 minutes. Then cover and remove from heat and let sit for 15 minutes, covered.
Remove the eggs from pan and place in an ice water bath for at least 5 minutes. Then remove the shell from each egg and set aside on a paper towel.
Slice the eggs the long way and scoop the yolk out and place in medium sized bowl.
Mash the cooked egg yolks slightly with a fork until crumbly.
Add mayo, mustard, salt and pepper and stir until smooth.
Spoon the mixture into the egg halves and top with paprika.
FILED UNDER:
NUTRITION FACTS (PER SERVING)
Nutrition information is calculated using an ingredient database and should be considered an estimate. In cases where multiple ingredient alternatives are given, the first listed is calculated for nutrition. Garnishes and optional ingredients are not included.
Frequently Asked Questions About Classic Deviled Eggs
Can I make Classic Deviled Eggs ahead of time?
Absolutely, you can prepare Classic Deviled Eggs up to 24 hours in advance—just store the filled eggs covered in the fridge. The flavors actually intensify overnight, making them even tastier. Pipe the filling right before serving to keep it looking fresh.
How long does Classic Deviled Eggs last in the fridge?
Your Classic Deviled Eggs will stay good for 3-5 days when stored properly in an airtight container. Beyond that, the mayo can make them unsafe, so it’s best to enjoy them soon. Always check for off smells before eating leftovers.
Are Classic Deviled Eggs gluten-free?
Yes, this basic recipe for Classic Deviled Eggs is naturally gluten-free, relying on eggs and simple seasonings. Just ensure your mayo and mustard don’t have hidden gluten additives. They’re a safe, delicious option for gluten-sensitive guests.
Can I use a different type of mustard in Classic Deviled Eggs?
Definitely—try whole grain or spicy brown mustard for varied textures in your Classic Deviled Eggs. It adds a fun crunch or heat without straying too far from tradition. Start with half the amount and adjust to your taste.
Why are my Classic Deviled Eggs hard to peel?
If your eggs are tough to peel, it might be due to their freshness—older eggs peel easier. Adding vinegar or baking soda to the boiling water helps too. Next time, let them cool completely in the ice bath for flawless results.
How can I make vegan Classic Deviled Eggs?
For vegan Classic Deviled Eggs, substitute eggs with boiled potatoes or chickpeas for the base, and use plant-based mayo in the filling. Add black salt for that eggy flavor—it’s a clever twist that fools even omnivores. Our vegan black bean chili page has more plant-based tips.
What’s the best way to pipe the filling for Classic Deviled Eggs?
A pastry bag with a star tip gives the prettiest swirls on Classic Deviled Eggs, but a plastic bag works in a pinch. Fill it generously but not too full to avoid bursts. Practice on a plate first if you’re new to piping.
Can Classic Deviled Eggs be frozen?
It’s not ideal to freeze Classic Deviled Eggs as the filling becomes watery upon thawing. Make them fresh instead for the best texture. If desperate, freeze just the whites and yolks separately, but expect some quality loss.
Final Thoughts
There’s nothing quite like the simple joy of homemade Classic Deviled Eggs to elevate any occasion, and I hope this recipe brings that magic to your table. From the easy prep to the burst of flavor in every bite, they’re a testament to how great food doesn’t need to be complicated. Give this a try soon—you’ll be hooked, and don’t forget to share your twists with friends. Happy cooking!